The same bands, brackets, and wires that enable braces to do their work create ample opportunities to trap bits of food among them. This makes it essential to combine a regular flossing routine with tooth brushing to reduce bacterial build-up from decaying food particles.
Wearing braces can make it more challenging to floss daily, but this does not reduce flossing’s importance to good oral health. In this article, we go over techniques to help your child floss effectively when wearing braces.
If you have questions about braces or flossing, call Ironwood Pediatric Dentistry at (480) 422-4544 to talk with a pediatric orthodontist at our Scottsdale office.
How to Floss with Braces: Traditional Flossing
Let’s look at two ways your child can floss with braces: using traditional floss or a water flosser.
First, let’s look at traditional flossing.
Brush the Teeth Before Flossing
Brushing twice a day with fluoride toothpaste promotes good oral hygiene. It is especially useful before flossing. Brushing should take about two minutes using a soft-bristle brush or an electric toothbrush.
- Brush the outer and inner tooth surfaces down to the gum line, holding the brush at about a 45-degree angle to the teeth, using gentle circular movements with the brush.
- Brush the chewing surfaces of the teeth with back-and-forth strokes.
- Rinse the mouth thoroughly after brushing.
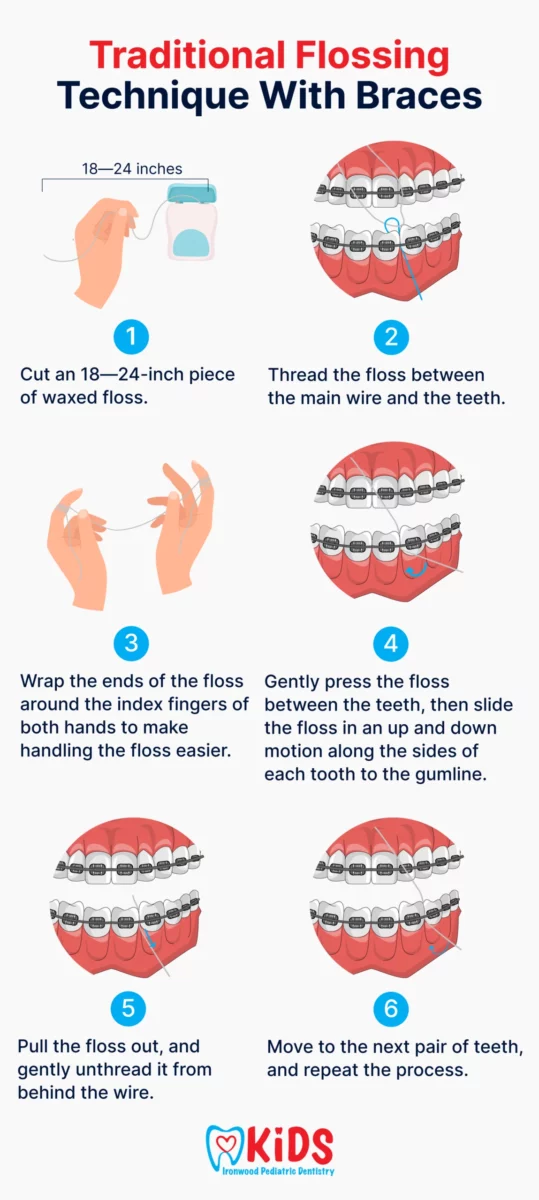
Traditional Flossing Technique With Braces
Flossing with braces requires patience because you need to floss around brackets and wires, particularly the archwire that connects the brackets together. The presence of this wire prevents flossing teeth the traditional way, so your child will need to use the workaround procedure below.
- Cut an 18- to 24-inch piece of waxed floss. Non-waxed floss can get caught in the braces.
- Thread the floss between the main wire and the teeth to be flossed, two teeth at a time. A helpful tool to use here is an orthodontic floss threader, a needle-like device that has a stiff point to make it easier for your child to thread the floss.
- Wrap the ends of the floss around the index fingers of both hands to make handling the floss easier.
- Gently press the floss between the teeth, then slide the floss in an up and down motion along the sides of each tooth to the gumline, creating a “C” shape with the floss..
- Pull the floss out and gently unthread it from behind the wire.
- Move to the next pair of teeth, and repeat the process.
Your child should devote about 10 to 15 minutes to this process to do it properly through the entire mouth.
Using a Water Flosser (Oral Irrigator)
If your child has trouble flossing in the modified traditional way above, an alternative is to use an electric water flosser, which is also known as an oral irrigator. As the names suggest, these devices use water jets to clean between teeth.
Water flossers come in a variety of models and prices. Some can cost as little as $50.
Others, like a Waterpik device, can cost a hundred dollars or more and include specialized tips for use with orthodontic appliances. Water flossers may not be as effective as flossing to thoroughly remove plaque buildup and food debris, but they are easier to use and less time-consuming than traditional flossing, taking about three to five minutes.
How to Floss With a Water Flosser
- Fill the device’s reservoir with water. You can add mouthwash to the water, but this is not necessary.
- Insert the tapered tip onto the water flosser. Turn on the device to send water through it to ensure it is working correctly and to gauge the strength of the water pressure. Turn the device off again.
- Have your child lean over the sink before putting the flosser’s tip in his or her mouth, then turn it on again.
- Glide the water stream along the gumline and between each tooth.
- While your child is using the water flosser, it is best to keep the mouth closed to keep water from splashing out, opening the mouth occasionally to let the water drain out.
To get more complete results, it can be helpful to brush the teeth again after using a water flosser and then repeat the steps above.
When your child is finished, empty the water reservoir and dry the flosser tip.
Using Dental Tape
If your child is new to flossing or has sensitive gums, introducing flossing with dental tape is a good idea. This form of floss is thinner and wider than regular dental floss, appearing more like a soft, spongy ribbon than a string floss. Dental tape can be more comfortable, and the method for using it is the same as traditional flossing.
When your child’s gums become used to dental tape, you can graduate to using regular, waxed floss.
How You Can Help Your Child Floss With Braces
For younger children new to braces, one way to introduce them to flossing is to start by flossing their teeth for them. As they become more comfortable with flossing, you can gradually help them start flossing for themselves.
It is also sound practice to schedule regular cleaning appointments with your child’s pediatric dentist every three months. This is a good way to keep braces clean in addition to brushing and flossing.
Trust Ironwood Dental for Your Childrens’ Dental Health
Ironwood Pediatric Dentistry provides child dental services in Scottsdale through all stages of your child’s growth, all the way to adulthood. We do checkups, dental fillings, braces and aligners, orthodontics, and oral surgery services. We can help you with practical advice on encouraging good oral hygiene habits for your children with braces and answer any questions you have about their dental health.
To schedule an appointment with one of our pediatric dentists, call us at (480) 422-4544 or use our contact form.